DIY crafts have gained immense popularity in recent years, and it’s not hard to see why. These creative projects allow you to customize your home decor and create unique, one-of-a-kind items. In this article, we’ll focus on DIY crafts that use recycled materials, promoting eco-consciousness and sustainability.
The Beauty of DIY Crafts

DIY crafts are all about unleashing your creativity and crafting something beautiful with your own hands. Whether you’re a seasoned DIY enthusiast or a beginner, there’s a project waiting for you.
Getting Started with Recycled Crafts
Recycling is not just about sorting your trash; it’s about finding new life for old items. Let’s explore how to get started with recycled crafts and turn trash into treasure.
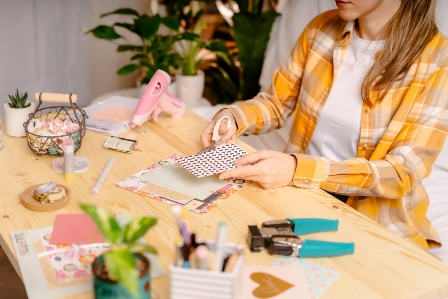
Essential Tools and Materials
When you’re about to embark on your recycled crafting journey, having the right tools and materials is crucial to ensure your projects turn out as planned. Let’s discuss the essentials you’ll need to get started.
Basic Crafting Tools
- Scissors:
High-quality scissors are essential for cutting various materials like paper, fabric, and more with precision.
- Glue Gun and Glue Sticks:
A glue gun is incredibly versatile for adhering materials together, and glue sticks are the fuel it needs.
- Craft Knife and Cutting Mat:
For intricate cutting and crafting, a craft knife and a self-healing cutting mat are indispensable.
- Ruler and Measuring Tape:
Accurate measurements are key to crafting success. A ruler and measuring tape help you achieve this.
- Pliers and Wire Cutters:
Essential for jewelry making and handling wire-related projects.
- Paintbrushes:
Different brushes for various painting techniques are a must-have.
- Sewing Kit:
A basic sewing kit with needles, thread, and pins is useful for fabric-based projects.
Safety Gear
- Safety Glasses:
Always protect your eyes, especially when working with tools and materials.
- Dust Mask:
For projects involving sanding, sawing, or any dusty materials.
- Gloves:
To keep your hands safe from sharp edges, hot glue, or chemicals.
3. Adhesives
- Craft Glue:
A versatile adhesive for paper, fabric, and some lightweight materials.
- Epoxy Resin:
Ideal for strong bonds on various surfaces, including glass and ceramics.
- Double-Sided Tape:
Perfect for clean and easy adhesion on paper and lightweight materials.
- Fabric Adhesive:
A must for fabric-related projects, offering a flexible bond.
Paints and Brushes
- Acrylic Paints:
A wide range of colors to add vibrancy to your projects.
- Watercolor Paints:
Ideal for a soft, translucent finish on paper and certain fabrics.
- Paint Palettes and Mixing Trays:
For blending and mixing colors effectively.
Materials for Recycled Crafts
- Old Magazines and Newspapers:
Perfect for paper mache, collages, and decoupage.
- Glass Jars and Bottles:
Great for upcycling into decorative items and storage containers.
- Fabric Scraps:
Leftover fabric pieces can be transformed into unique textile projects.
- Wooden Pallets and Crates:
Excellent for upcycled furniture and home decor.
- Broken Jewelry:
Salvage old jewelry for crafting components like beads and pendants.
- Scrapped Electronics:
Explore the potential of discarded electronic components in your projects.
With these essential tools and materials in your crafting arsenal, you’re well-prepared to embark on your recycled crafting journey. Whether you’re turning old items into new treasures or creating unique pieces from scratch, these resources will be your best companions throughout your creative process.
Creative DIY Ideas for Home Decor
Upcycled Furniture
Transforming old furniture into statement pieces can completely change the look and feel of your home. Discover the art of upcycling furniture.
Repurposed Glassware
Those old glass jars and bottles can be turned into stunning decorative pieces with a little imagination. Explore repurposing glassware.
Vintage Textile Revival
Vintage fabrics can be repurposed into unique cushions, curtains, and more. Learn how to breathe new life into old textiles.
Crafting with Sustainability in Mind
Being eco-friendly and sustainable is at the core of recycled crafts. Explore how these projects can contribute to a greener planet.
Tips for Successful Upcycling
Upcycling is a rewarding and environmentally friendly way to give new life to old items. To ensure your upcycling projects are successful and satisfying, consider these tips:
Choose Quality Over Quantity
Select items for upcycling that are in relatively good condition. High-quality materials and sturdy structures make the transformation process smoother and result in longer-lasting creations.
Plan Your Project
Before you start, sketch out your project and gather all the necessary tools and materials. Having a clear plan will help you stay organized and on track.
Clean and Prepare
Thoroughly clean and prepare the item you’re upcycling. Remove any dirt, rust, or old finishes, as a clean surface ensures better adhesion for paints and other materials.
Embrace Creativity
Don’t be afraid to think outside the box. Upcycling allows for creative freedom. Experiment with different colors, patterns, and techniques to make your project unique.
Ensure Safety
Wear appropriate safety gear, especially when working with tools, paints, or chemicals. Safety glasses, gloves, and dust masks are essential for your protection.
DIY Craft Safety Measures
Safety is paramount when working with tools and materials. Ensure you’re well-informed about safety measures to enjoy crafting without worries.
Step-by-Step Recycled Tutorial: Hand-Painted Mason Jars
The step-by-step tutorial on how to create beautifully hand-painted mason jars. These charming and versatile containers can be transformed into stunning decor pieces with a little creativity and some basic materials.
Materials You’ll Need
Before you begin, gather the following materials:
- Mason Jars: Clean and dry jars, preferably with smooth surfaces.
- Acrylic Paints: A variety of colors to suit your design.
- Paintbrushes: Different sizes for various details.
- Paint Palettes: For mixing and diluting paints.
- Water: For rinsing brushes.
- Paper Towels: To blot excess paint.
- Masking Tape: For creating clean lines or patterns.
- Sealant: Mod Podge or clear varnish for sealing your artwork.
- Workspace Cover: To protect your working surface.
Preparation
- Clean the Jars: Ensure your mason jars are clean and free from dust or debris. Wash them thoroughly and let them dry completely before starting.
- Design Planning: Decide on the design or pattern you want to paint on your jars. You can go for simple, elegant designs or more intricate and colorful patterns.
- Masking: If you plan to create clean lines or distinct sections on your jar, apply masking tape to the areas you want to keep free of paint. This will help you achieve precise designs.
Painting Technique
Now, let’s get into the painting process:
- Select Your Colors: Choose your acrylic paint colors. For a cohesive look, stick to a specific color scheme or theme.
- Base Coat: Start by applying a base coat to the entire surface of the mason jar. This can be a single color or a gradient of colors. Use a large paintbrush for this step.
- Design Execution: Once the base coat is dry, it’s time to execute your chosen design. Use smaller brushes for details and patterns. Be patient and take your time to ensure accuracy.
- Blending: If you’re blending colors, work quickly while the paint is wet to achieve smooth transitions. Blending can create a stunning, watercolor-like effect.
- Dry Between Layers: Allow each layer of paint to dry before adding the next. This prevents smudging and ensures clean lines.
- Remove Masking Tape: If you used masking tape, carefully peel it off once the paint is completely dry to reveal the clean lines.
Drying and Sealing
To preserve your artwork and make it more durable:
- Drying Time: Let your painted mason jars dry completely. This may take a few hours or overnight, depending on the thickness of the paint layers.
- Sealing: Once the paint is dry, apply a sealant such as Mod Podge or clear varnish. This step protects your artwork and gives it a lovely, glossy finish. Apply a thin, even coat and let it dry according to the product instructions.
Final Touches
- Inspect Your Work: Examine your painted mason jars for any imperfections or areas that need touch-ups. Use a fine brush to make corrections if necessary.
- Decorate: To enhance the aesthetics of your jars, consider adding additional elements like ribbons, twine, or decorative labels.
With these steps, you’ve successfully transformed ordinary mason jars into beautifully hand-painted works of art. These versatile pieces can be used as vases, candle holders, or simply as charming decor in your home. Enjoy your creative journey!
Hacks for Finding Recyclable Materials
Finding recyclable materials for your craft projects can be an exciting and eco-conscious endeavor. Here are some innovative hacks to source materials without straining your budget:
Raid Your Recycling Bin
Start with the most accessible source: your own recycling bin. Items like glass jars, plastic containers, cardboard, and paper can be repurposed for various crafts.
Thrift Stores and Garage Sales
Explore your local thrift stores and garage sales. You can find an array of items like old furniture, frames, and vintage textiles at a fraction of the cost of new materials.
DIY Craft Community and Inspiration
The DIY craft community is a vibrant and inclusive space where individuals with a passion for crafting come together to connect, share their projects, and find inspiration. Here’s how you can become a part of this creative and supportive community:
Online Craft Forums and Groups
Joining online craft forums and social media groups is a great way to connect with fellow crafters. Platforms like Reddit, Facebook, and crafting-specific websites host numerous communities where members share their work, seek advice, and inspire one another.
Crafting Workshops and Classes
Consider enrolling in crafting workshops or classes in your local area. These hands-on experiences allow you to meet like-minded individuals, learn new techniques, and share your passion for crafting.
Eco-Friendly Living and Sustainability
Recycled crafts play a pivotal role in the broader context of sustainable living and eco-consciousness. They are a tangible expression of the principles of reusing and reducing waste while fostering creativity and self-sufficiency. Here’s how recycled crafts contribute to a more eco-friendly lifestyle:
Waste Reduction
Recycled crafts fundamentally promote waste reduction. By reusing materials that would otherwise end up in landfills, you divert waste from the disposal cycle, lessening the burden on the environment.
Resource Conservation
Creating art or functional items from discarded materials minimizes the need for new resources. This conservation of raw materials, be it wood, glass, fabric, or paper, reduces the environmental impact associated with resource extraction and production.
FAQs
Here are some frequently asked questions along with their concise answers:
Recycled crafts involve repurposing old or discarded materials to create new, useful, and aesthetically pleasing items.
Recycled crafts are not only environmentally friendly but also allow you to personalize your home decor and express your creativity.
Yes, recycled crafts are perfect for beginners. Many projects are simple and require minimal experience.
You can find recycled materials at thrift stores, garage sales, and even in your own home.
You can share your creations on social media platforms, join DIY communities, or even participate in craft fairs to showcase your work.
Conclusion
Incorporating beautifully recycled tutorials into your home decor is not only a creative endeavor but a step towards a more sustainable lifestyle. Embrace the art of DIY crafting and witness the transformation of your living space.